
GSO Astrangia Airbrushing & Clipping
Goal: Clip and airbrush Astrangia samples from 2021 experiment
This post is modified from H. Putnam original airbrushing protocol and E. Strand airbrushing protocol
Important things to remember before starting:
- Never touch fragment with your fingers
- Sterilize materials between each sample with 10% bleach and 70% ethanol
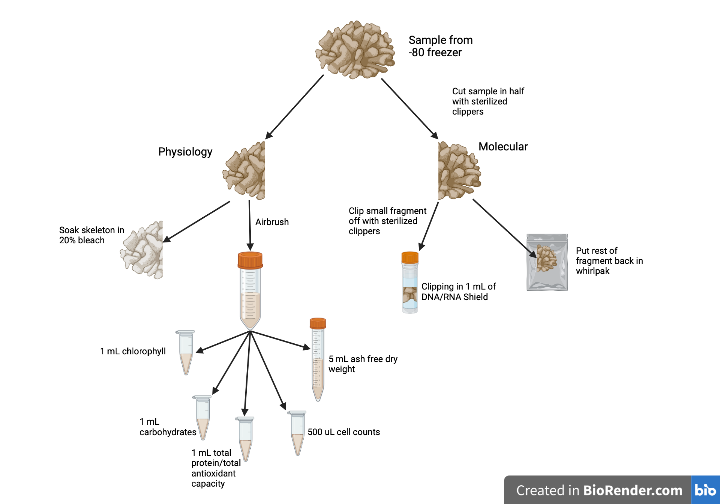
Diagram protocol
Equipment/materials
- Iwata airbrush set - includes airbrush, air compressor, bottle, hose, etc
- Homogenizer kit
- P1000 pipette and tips
- 1.5, 15, and 50 mL tubes
- 2 mL tubes w/ glass beads
- DNA/RNA shield
- PBS
- 70% ethanol
- 10% and 20% bleach
- DI water
- Paper towels/kim wipes
- Foil
- Sterile pads
- Various sizes of clippers and tweezers
- Coolers w/ dry ice
- Ziplock bags and small containers
Set-up
Working area:
- Spray benchtop down with 70% ethanol and wipe down.
- Tape a puppy pad down on the benchtop. This will be the working area. add picture
- Get out clippers and sterilize with 10% bleach solution, DI water type II, and 70% ethanol (in that order).
- Get out 3 small coolers of dry ice from the -80 freezers (likely the the J -80°C freezer). Sterilize a piece of foil using the 10% bleach solution, DI water type II, and 70% ethanol, and put this on top of the dry ice in one of the coolers.
Airbrush set up:
- Get out the Iwata air compressor from cabinet B D6 and plug it in. The air compressor does not need to be on the sterile pad. Get the airbrush and connecting hose out from cabinet B D7.
- Connect one end of the connecting hose to the air compressor. Connect the other end to the airbrush. add picture
- Fill the airbrush bottle with cold PBS solution. Cap the bottle and attach to airbrush. add picture
PBS solution is usually kept in the 4°C fridge. To make more PBS solution, combine PBS (Phosphate-Buffered Saline) tablets and DI water in a bottle. The PBS tablets are in the cabinet to the right of the sink in the PPP hood room. For every 100mL of PBS solution, add one tablets of PBS to 100mL of DI water (i.e., making 500 mL of PBS, combine 500mL of DI water and 5 PBS tablets in bottle).
- Turn on the air compressor.
- Rinse the airbrush for 30 seconds. Aim the nozzle of the airbrush (end closest to the airbrush bottle) into an empty 100 mL beaker. Push down (pulls air from the compressor) and pull back (pulls water from the bottle) on the trigger to operate.
Sample labeling:
- Collect necessary tubes and ziplock bags, and label for each sample. Label each tube with the specific assay that it will be used for. The following is needed for each sample: add pictures
- one 2 mL bead tube with 0.5 mm beads (used for DNA/RNA extractions; “DNA/RNA”)
- one 2 mL tube for chlorophyll a (“Chl”)
- one 2 mL tube for cell counts (“CC”)
- one 2 mL tube for protein/TAC (“Prot”)
- one 2 mL tube for carbohydrates (“Carb”)
- one 15 mL tube for ash free dry weight (“AFDW”)
- one 50 mL tube for remaining homogenate (“Remaining Homogenate”)
- one ziplock bag for airbrushing
Label tubes with sample ID, airbrushed date, initials, and what the tissue will be used for (the words in quotes above). Label the ziplock bag with just the sample ID
Coral clipping
- Take the coral fragment out of the freezer, put into one of the dry ice coolers and close lid.
- Move the coral fragment to the cooler with the tin foil, open the whirlpak, and using the sterilized clippers, move the fragment onto the foil. add picture
- Using the sterilized large clippers (add picture), cut the fragment in half.
If sample is too small or breaks into lots of little pieces: prioritize clippings for molecular samples. If there is still sample left over, airbrush whatever is there and aliquot out that tissue homogenate. If there is too little homogenate to do all the aliquots, prioritize the aliquots in this order: carbohydrates, protein/TAC, chlorophyll a, cell counts, ash free dry weight. Make a note that this sample does not have all the aliquots and let Jill know.
-
Using the sterilized clippers, clip a small section. Put this section in the 2 mL tube with the glass beads in it. Immediately add 1 mL of DNA/RNA shield and put in the third dry ice cooler. Move one half of the fragment back into the whirlpak.
- Close the whirlpak with the fragment in it and put it in the third cooler. This will be backup sample for molecular extractions.
- To store, put the clipped fragment in the bead tube in a designated freezer box and store in the G -80°C freezer. Put the whirlpak in a bag labeled ‘Astrangia fragments clipped’ and store in the G -80°C freezer.
Airbrushing
- Put the other half of the fragment into the ziplock bag and keep in cooler on foil.
- Using the sides of the whirlpak, hold the coral fragment in the whirlpak (never touch the fragment with your gloves). Hold it in the cooler on the foil so the sample is kept cold.
- With your other hand, hold the airbrush so that you are able to push down and pull back on the trigger only using one hand.
- Push down and pull back on the trigger to operate the airbrush, hovering over a section of tissue to clear the skeleton before releasing moving on to another section. Hold the airbrush nozzle at least an inch above the coral fragment so that the polyps and sharp structure of the coral does not damage the fragile airbrush pieces.
- Rotate the fragment in the bag to airbrush entire coral. Hold the ziplock bag facing upwards so no tissue is lost.
- Remove as much tissue as possible. The white coral skeleton will show as one airbrushes, and airbrush until the fragment is as white as possible. The fragment may not turn completely for Astrangia because there are so many other endolithic organisms in/on it.
- Sterilize airbrush and clippers between samples using 10% bleach and 70% ethanol.
Collecting homogenate
- Using tweezers, remove the coral skeleton and place on a paper towl on the benchtop.
- Tilt the whirlpak containing the tissue homogenate slightly to the left so that the homogenate aggregrates in one corner of the bag.
- Using sterilized scissors, cut the bottom right hand corner of the whirlpak.
- Gently pour the homogenate out of the whirlpak into a 50 mL falcon tube.
- Record the volume (mL) of homogenate.
Homogenization
- Get out the handheld homogenizer located in B D8 and plug it in. Connect the large micro-homogenizer piece.
- Label three 50 mL falcon tubes - one with 10% bleach, one with 70% ethanol, and one with DI water (add the date and initials). Sterilize the microhomogenizer by dipping and running the piece in the appropriate falcon tube in this order:
- 10% bleach
- 70% ethanol
- DI water II
- Wipe down with a kimwipe.
- Place the microhomogenizer in the coral tissue homogenate 50 mL tube and turn it on starting at a low speed. Gradually increase the speed of the microhomogenizer until it is at max speed. Homogenize for 1 minute.
If the sample still looks chunky, continue homogenizing and make a note of length of time and speed of microhomogenizer.
Aliquot
- From the 50 mL falcon tube:
- Aliquot 1 mL of tissue homogenate into the “Chl” tube
- Aliquot 1 mL of tissue homogenate into the “Prot” tube
- Aliquot 1 mL of tissue homogenate into the “Carb” tube
- Aliquot 500 uL of tissue homogenate into the “CC” tube
- Aliquot 5 mL of tissue homogenate into the “AFDW” tube
If there isn’t enough homogenate for all aliquots, think about your research questions and make educated decision on what metrics would be best to look at.
- Place the 50 mL tube of tissue homogenate stock in a bag labeled ‘Astrangia remaining homogenate phys’ and store in the J -80°C freezer.
- Put chlorophyll, protein, and cell count homogenate in their designated freezer boxes and store in the G -80°C freezer.
- Put the 15 mL AFDW tube on a tube rack and store in the J -80°C freezer.
Bleaching
- Label a small tupperware container with the sample ID.
These containers should have bleach written on them. Check w/ Hollie beforehand if using a different container.
- Using the sterilized tweezers, transfer the skeleton from the paper towel/ziplock bag to the container. The skeleton needs to be completely free of coral tissue and as white as possible.
- Pour enough 20% bleach to cover the entire skeleton. Let sit for 24 hours.
- After 24 hours, use sterilized tweezers to remove the skeleton and place on a paper towel labeled with the sample ID. Let dry for 24 hours.
- After 24 hours, use sterilized tweezers to move the skeleton from the paper towel to a ziplock bag labeled with the sample ID.
- Store skeletons in xxxxxxxxx
Clean up
- Sterilize all scissors and clippers used throughout the protocol.
- Disconnect airbrush and homogenization set-up and put equipment away in its respective storage location.
- Wipe down benchtop with 70% ethanol.
- Make sure there is nothing still in the dry ice coolers, and put them away in the the J -80°C freezer.
- Throw away any garbage produced throughout protocol.
- Empty any full tips containers and restock equipment and solutions as needed.
For reference: Master fridge/freezer spreadsheet. This will have the location of all my samples, aliquots, clippings, homogenates, etc.